

In Part One, I showed you how to make the signatures (the pages) that go into this book. Today, I am going to show you how to make the cover and attach the pages to finish the book.
A YouTube video of the process is here: Ephemera Storage Journal Part Two Video
Part One of the series is here: DIY Ephemera Storage Journal
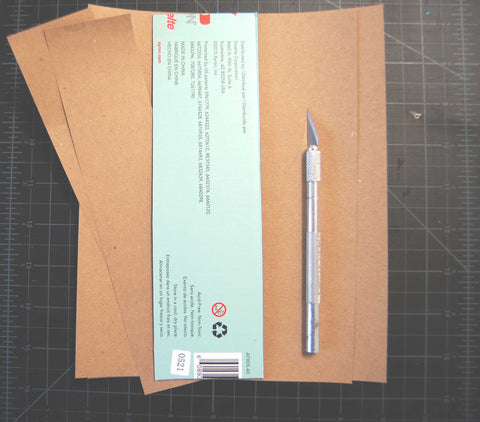
Supplies

- A sturdy box
- Sturdy thread and a needle (Waxed bookbinding thread is ideal if you have it)
- Scissors
- Pen
- Awl or other pokey tool
- Exacto knife
- White glue (I also like to use rubber cement in some parts)
- Ruler
- Binder clips
Step One

Place a completed signature (from Part One) onto your dismantled box to measure how big to make the front cover. You want the cover to be just slightly bigger than the signature on the top and the bottom. If you plan to add tabs to the signature, but haven't yet done it, add extra room on the side for them now.
Cut out a front and back cover for your ephemera journal.
Step Two

Use the front or back cover to measure a third rectangle for the spine. Make it the length of the cover by 2 1/2 inches. (This is for 3 signatures with extra spacing in between.)

Step Three

Glue one side of a cover to the kraft paper. I use rubber cement for this part to reduce the wrinkling. Cut out, leaving a rough margin of about 1/2 inch on all sides. Clip the corners as shown to reduce bulk.
Apply white glue to the kraft paper flaps and fold over the cover and smooth. Clip to hold in place while drying. Repeat using the other cover and the spine so that all 3 pieces of the cover have kraft paper on one side.
Step Four

Use one of the covers to measure and cut 2 pieces of kraft paper exactly the same size (or a tiny bit smaller) as the cover. We will use these as a last step to cover the inside of the covers.
Use the spine to measure 4 lengths of kraft paper. 2 of them are 2 inches by the length of the spine. One is 6 1/2 inches by the length of the spine. And one is 7 inches by the length of the spine. We will use these later to attach the covers to the spine.
Step Five

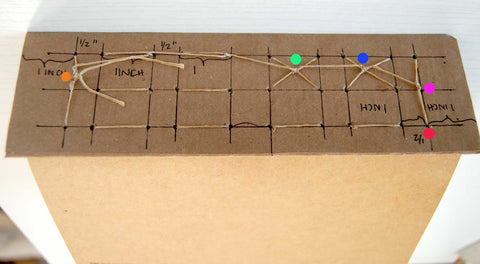
At the top of the spine, on the UGLY side (NOT on the kraft paper side) use the pen to mark 1/2 inch, 1 1/4 inch, and 2 inches. So you are marking the middle, and 1/2 inch in from each side.

Do the same on the bottom and draw lines connecting the dots. This is where you will sew in your 3 signatures.

From the top of the spine, on one side mark 1 inch, then 1/2 inch, 1 inch then 1/2 inch, then 1 inch. From the bottom of the spine, do the same thing.
You will have a space in the middle of indeterminate size. This is a simple way to make symmetrical stitches without calculations.
Make the same markings on the other side and connect the dots, forming a grid.
Using the awl, poke holes through the spine at each intersection.
Step Six

Open one of the signatures to the middle (so there are 3 pages on each side). Center the spine so equal amounts of the spine overlap the top and the bottom of the signature. Use the holes in the spine as a templet to make holes down the center fold of the signature. Repeat on all 3 signatures.
Step Seven
Measure a length of thread 4 times the length of a signature plus 5 inches. Thread the needle. Do not knot the thread.
Decide which signature you want first in the book. Make sure it is facing the right way, with the top of the signature at the top of the spine (so the pockets aren't upside down.)

Put the needle through the top right hole of the spine, then into the top hole of your first signature.


Make sure the needle is coming through to the center of the signature.

Pull the thread nearly all the way through, leaving about 6 inches on the outside of the spine. Use tape to secure it.
Step Eight

Bring the needle and thread down through the second hole & through the second hole of the spine. Then repeat down the spine until the spine and the signature are sewn together.
Step Nine

When you are at the bottom of the spine after sewing the first signature, stitch over to the middle of the spine. Make sure that your pockets are facing upwards and attach the second signature in the same way, sewing up the spine. When you get to the top, tie a knot with the loose edge of the thread. (Note: I didn't do this step on the video. The point here is to make the whole thing secure however you chose to do it.)
Move over to the last row and attach the third signature in the same way.
Step Ten
Our thread is now at the bottom of the signature (red dot). Our goal is to get it back to the top to tie it off to the tail of the thread we started with. We also want to secure it and tighten up the signatures as we go. I looped around the thread connecting the 1st and 2nd signatures and tied a knot (pink dot). Then I sewed under the threads for the 1st and 2nd signatures, pulled them tight and tied a knot (blue and green dots). Etc, etc until I got to the top and pulled both ends of the thread tight and knotted them. This can be done in many ways.
Step Eleven

Find the 6 1/2 piece of kraft paper you cut and lay it down under the junk journal. Dot some glue on all of the knots you just tied. Then cover the whole spine with glue and brush it as smooth as you can.

Place the glued spine as close to the center of the kraft paper as you can. It helps to put a rubber band around the signatures so you can see what you are doing.

Turn the spine to face upwards and smooth it down as best you can. It will be ugly. Don't worry, another layer goes on top.
Step Twelve

Place the spine back down on your desk. Spread glue all over the kraft paper, leaving 1/4 inch from the spine unglued.

Place the pretty side of one of the covers on the glued kraft paper, aligning edges and leaving 1/4 inch of space between the spine and the cover. Repeat with the other cover.
Step Thirteen

Using one of the 2 inch pieces of kraft paper you cut earlier, glue it as close as you can to the spine, and to the the cover, covering the 1/4 inch space between them. Align edges.

Clip the kraft paper so it can dry. Repeat on the other cover. With both sides still clipped, carefully fold the junk journal closed and stand it up and make sure the bottom edges are all even.
Step Fourteen

Using the 7 inch piece of kraft paper you cut earlier, place a thin layer of glue on it and brush it smooth. Center it on the spine and make sure it is straight and centered as possible. Fold it over to cover the first layer of kraft paper. Smooth in all directions.
Step Fifteen

On the inside of the journal, use the last 2 pieces of kraft paper you cut earlier to cover the inside front and back covers. Place as close to the outside edges of the covers as you can.

Your journal construction is finished! Decorate is as you like.