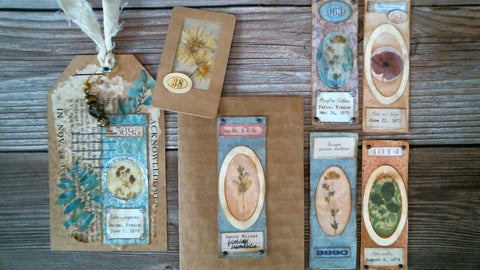
For some reason, I searched online for "botanical specimen slides" and found some wonderful stuff. Apparently, botanists used to wrap their glass microscope slides in pretty papers and label them. So, of course, I had to make some faux botany slides of my own.

I liked them so much fun that I made a digital kit to make the process easier.
Here's a link if you want to buy the files to print these yourself. Botany Specimen Slides Printable
Here's what you need to make your own:

- Small floral stickers or dried flowers
- Pretty papers, or the Vintage Botany Slides printout
- Small labels and numbers, or the Vintage Botany Slides printout
- Rubber cement
- Scissors to rough up the edges to age them
- Small scissors to cut out the centers of the slides (or circular punches)
- Brown ink to age the papers
- Brads, stamps, Glossy Accents, etc. to decorate
Here's how I made them:
Step One

If using the printable, print the colorful side fronts, a background page, and the labels and numbers onto copy paper. Print the slide backs onto cardstock. Cut out a front, back, and a few labels. Also, get a piece of background paper that will cover the hole in the slide front paper. Use the brown ink to distress and age all of the pieces. If not using the printable, use your own papers to cut out the shapes. The size is about 3.25 " by less than 1.25".
Step Two

Glue your flower or sticker to the background paper so it looks good peeking through the hole in the slide front.
Step Three

Cover the white side (the unprinted side) of the slide back with rubber cement. Place the background with the flower approximately in the middle of the slide back.
Step Four

Quickly apply a little rubber cement to the back of the slide front around the cutout frame and place the slide front on the slide back, matching edges. Move the flower around until it looks good peeking out of the frame. (The rubber cement stays slippery for a while.)
Step Five

Add labels and numbers from the kit or any small labels or stickers that you may have.
Step Six

Use scissors to rough up the edges to age it. Use brown ink to cover any white edges. Decorate as you wish with stamps, stickers, brads, etc. If using brads, they will stick out as in the upper left of the photo. Just clip them off with scissors. I like to fill the circular frame with Glossy Accents so it's shiny and hard and looks like glass. Here's a link to purchase Glossy Accents if you are interested: Glossy Accents
Use the slides as ephemera in your junk journals and scrapbooking projects. Here's a video if you are interested: Botanical Specimen Slides Video


